In the high-tech world, where user experience is paramount, ensuring your web apps’ visual quality and consistency across varied devices and browsers is a critical challenge. Visible defects can rapidly erode user satisfaction and trust, damaging reputations and losing revenue.
Traditional manual test techniques, while effective, can be bug-prone and time-consuming, making them ill-suited for the demands of modern web development. This is where Selenium testing comes to the rescue, offering rapid feedback and helping you catch visual bugs before they reach your target users.
In this article, we’ll explore automated visual testing with Selenium, a robust open-source tool extensively used for web automation. From the basic to advanced methods, you’ll discover how to leverage Selenium to guarantee your web app’s user interface (UI) remains visually faultless across multiple browsers, screen sizes, and resolutions.
When evaluating automated testing frameworks for web applications, developers often compare newer tools like Playwright to traditional options like Selenium; while playwright vs selenium both allow simulating user actions, Playwright was built specifically for modern web apps and avoids limitations Selenium can have when dealing with elements like SPAs or complex JavaScript.
What is Visual Testing?
Visual testing, also called snapshot testing or visual regression testing, is an automated software test process. It mainly compares the optical output of an app against a snapshot or baseline image. The prime objective of visual testing is to detect any unplanned visible changes or regressions in the UI of an app when new code alterations or updates are made.
Visual testing is instrumental in apps where the UI (user interface) plays a significant role, such as mobile apps, web apps, and desktop software. One of the crucial rewards of visual testing is that it helps catch visual bugs that the traditional test approach might miss. However, it can also be sensitive to minor modifications, so managing the baseline images carefully is essential to avoid false positives.
Popular visual testing tools include Cypress and Applitools, with visual test plugins. Such tools help automate the method of capturing and comparing snapshots. They can be incorporated into CI/CD (continuous integration/continuous delivery) pipelines to ensure visual quality throughout the software development lifecycle.
What is Automated Visual Testing?
Automated visual testing is one of the techniques used to verify that a web app’s user interface (UI) appears correctly to users. It is employed to capture screenshots of web pages and compare them to baseline images to detect any visual errors/ discrepancies. Such discrepancies could be variances in styling, layout, or content that might have been introduced during software development or due to modifications in the application.
Automated visual testing, as described, is a crucial quality assurance method that focuses on validating the visual aspects of a web app’s user interface.
Here are some significant points to emphasize about automated visual tests:
- Exposure to Visual Discrepancies
The automated visual test aims to detect differences or discrepancies between the current state of a web app’s User Interface and a predefined baseline, which signifies the expected or correct appearance of the User Interface.
- Compatibility Testing
Automated visual testing assists in addressing the challenges or intricacies of cross-device and cross-browser compatibility. It ensures the web app functions and looks as intended across device and browser configurations.
- Validation of Styling, Layout, and Content
It also covers several facets of visual presentation, including styling (e.g., colors, fonts), layout (e.g., positioning of components), and content (e.g., images, text). It ensures that these visual components are consistent across distinct environments and browser versions.
- Benefits of Automation
While manual testing can be practical, automated visual tests bring repeatability and efficiency. Automated testing could be implemented rapidly and constantly, making it possible to catch visual bugs early in the development cycle.
- Incorporation with Selenium
Selenium, as mentioned, is the most preferred tool for web automation. By incorporating Selenium with visual testing tools or libraries, developers can extend their proficiencies to embrace visual validation in their automated test scripts.
- Rapid Feedback
One of the main benefits of automated visual testing is its capability to provide speedy feedback to testers and developers. When visual bugs are noticed, they can be addressed promptly, reducing the expense and time associated with bug fixes.
- Continuous Integration
Automated visual tests can be flawlessly incorporated into a CI (continuous integration) pipeline, enabling automatic testing with every code change. This incorporation helps maintain visual consistency throughout the development process.
- Collaboration
Automated visual tests foster collaboration among design, development, and QA teams. Visual test reports clearly show glitches, facilitating joint efforts and proper communication to resolve visual discrepancies.
Necessity for Rapid Feedback
Traditional manual test techniques are adequate but can be slow and bug-prone. Manual testing becomes less effective with the increasing intricacy of web apps and the necessity to support multiple browsers and devices. This is where automated visual testing comes into play. This form of testing provides instant feedback to software developers. It helps catch graphical errors early in the Software Development Life Cycle (SDLC), thus reducing the extra effort and time needed for bug fixes.
- Selenium: A Robust Automation Tool
Selenium is a globally accepted and extensively used free tool for automating web browsers. Selenium allows web developers to write scripts in several programming languages, such as Java, Javascript, and Python, to interact with web pages, extract information, and perform actions. Selenium can also be extended to support automated visual tests by incorporating it with visual testing tools and libraries.
Let us take a closer look at why Selenium is considered a go-to choice for web automation:
- Support for Multiple Programming Languages
It provides language bindings for popular programming languages such as Ruby, JavaScript (Node.js), Java, Python, C#, and Kotlin. This flexibility enables software developers to write automation scripts in their desired language.
- Cross-Platform and Cross-Browser Compatibility
It also supports multiple web browsers, including Firefox, Chrome, Edge, and Safari. This cross-browser compatibility ensures your web app functions constantly and consistently across distinct platforms and browsers.
- Extensible Architecture
Selenium’s extensible and modular architecture makes it easy to incorporate with third-party libraries and tools. This extensibility is critical when extending Selenium to support automated visual tests.
- Interactive Browser Automation
It enables you to interact with web pages just as a user would. You can simulate user activities like filling out forms, clicking buttons, navigating through web pages, and extracting info, making it suitable for E2E testing.
- Incorporation with Visual Testing Libraries
Selenium can be extended to embrace automated visual testing abilities by incorporating it with visual testing tools. These incorporations allow the evaluation of screenshots to discover visual discrepancies.
- Community Support
Selenium boasts an active and vast community of software developers and testers. This community supports outcomes in plugins, continuous updates, and a wealth of resources, counting forums, and documentation, making it more straightforward for customers to find solutions to common challenges.
- Cross-Device Testing
With Selenium Grid, you can run cross-device testing by simultaneously distributing test implementation across multiple devices and machines. This ensures your web app is compatible with several screen resolutions and sizes.
- Integration with Continuous Integration (CI) Tools
Selenium can flawlessly incorporate CI tools like CircleCI, Jenkins, and Travis CI, letting automated tests be performed as part of your CI/CD pipeline. This incorporation ensures that tests are run constantly with code modifications.
- Parallel Test Execution
Selenium also supports parallel test execution, which smartly reduces the time required to run an extensive suite of tests. This is crucial to maintain fast feedback loops in the agile development environment.
- Cost-Effective
Selenium is a free/ open-source tool, meaning no licensing expenses are linked to its use. This cost-efficiency appeals to companies looking to automate their test procedures without significant financial investment.
- Setting Up Automated Visual Test with Selenium
Automated visual tests with Selenium can certify the visual consistency of your web app across different devices and browsers. Let’s take a glance at the basic steps to set up automated visual testing with Selenium:
- Setup Your Development Environment
Before you start, make sure that you have the following tools and dependencies installed:
- Selenium WebDriver: Install Selenium WebDriver for your ideal programming language. You can use languages such as JavaScript, Java, or Python. You can install it using package managers such as npm, pip, or Maven.
- Visual Testing Library: Select a visual testing library or tool to incorporate with Selenium. Popular choices include Playwright for optical testing.
- Browser Drivers: Download and set up suitable browser drivers (e.g., GeckoDriver for Firefox, ChromeDriver for Chrome) to allow Selenium to interact with precise browsers.
- Write Test Scripts
Generate test scripts using Selenium WebDriver that navigate to the web pages you wish to test and execute actions as needed. Such scripts will capture screenshots of web pages for visual assessment. Here’s an illustration in Python:

- Set up Baseline Screenshots
To execute a visual comparison, you require baseline screenshots that represent the expected visual look of your web app. Try to capture these baseline screenshots for the pages you are testing and collect them in a designated directory.
- Incorporate the Visual Testing Library
Incorporate your selected visual test library with Selenium. This typically includes adding the library’s SDK or dependency to the specific project and configuring it to function with Selenium. Consult the documentation of the particular library you have preferred for detailed instructions on integration.
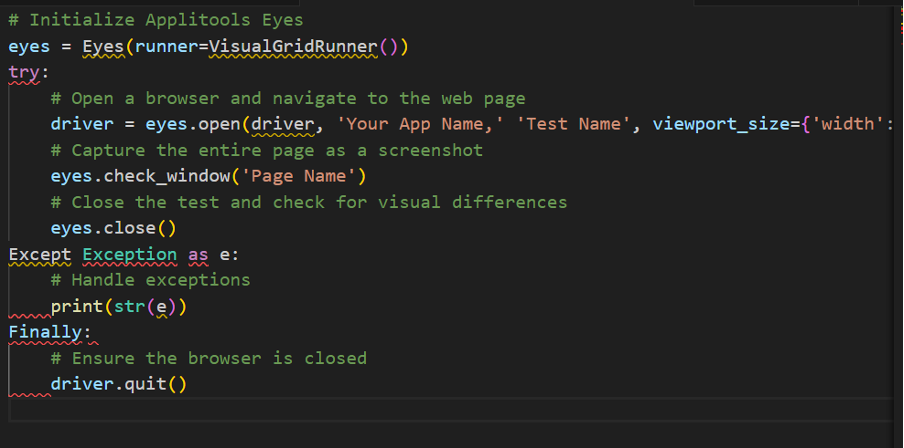
- Capture & Compare Screenshots
Improve your Selenium test scripts to capture screenshots of the web pages under test and match them to the baseline images via the visual testing library. Here’s a case using Applitools Eyes in Python:
From apply tools. selenium import Eyes, VisualGridRunner
Run Automated Visual Tests
Automated visual testing is a powerful tool to detect and fix visual issues early in the development process, improving the user experience.
- Create a Test Suite (Optional)
If you have multiple visual tests to perform, it is a great practice to synchronize them into a test suite. A test suite enables you to group related testing and serve them together. You can generate and configure a test suite according to your selected testing framework.
- Set up Test Configuration
Before running your automated visual tests, configure your test environment. This includes specifying the devices, browsers, and other testing parameters you wish to use. Make sure that your WebDriver is properly initialized and ready to use.
- Run Your Tests
Now, it’s time to perform your automated visual tests. You can select to run them locally on your development machine or incorporate them into your Continuous Integration (CI) pipeline for computerized tests on code commits. The implementation technique may vary based on your CI/CD setup and test framework.
- Local Implementation: To run tests locally, you can typically use a test runner specific to your testing framework or programming language. For instance, you can use pytest or unittest to perform your test scripts in Python. In Java, you could use tools such as TestNG or JUnit. Run the following command:
Example (Python with pytest): pytest visual_test_script.py
- CI/CD Integration: If you incorporate visual tests into the CI/CD pipeline, ensure your CI configuration (e.g., Travis CI, Jenkins, GitHub Actions) is set up to perform the visual tests automatically on code commits. You can consult your CI/CD tool’s documentation for details on configuring the pipeline.
- Review Test Outputs
After performing your visual tests, review the results produced by the visual tests library. These results will indicate whether there are any visual inconsistencies between the captured baseline images and screenshots. Pay close attention to any failing tests and the descriptions of the reported visible variances.
- Debug and Resolve Problems
If your visual tests detect visual discrepancies, it is essential to investigate and resolve them on time. The debugging procedure might include:
- Reviewing the failed screenshots to know the nature of the issue.
- Scrutiny of the app’s code and CSS for potential problems.
- Making essential adjustments to the app’s code or baseline screenshots.
- Updating the test scripts to maintain dynamic content or changes in the User Interface.
- Update Baseline Screenshots (If Required)
Over time, as your app progresses, you may need to update the baseline screenshots to reflect the fresh appearance. Whenever there are noteworthy changes to the User Interface, produce edited baseline images to ensure your visual tests remain relevant and accurate.
- Repeat Testing
Automated visual tests must be an ongoing process. Constantly run your visual tests as part of your QA test workflow to catch visual regressions and confirm that your app maintains a steady and visually appealing UI.
- Incorporate with CI/CD Pipeline
Consider incorporating your visual tests into your CI/CD pipeline for automated and consistent visual testing. This ensures that visual testing is executed automatically with each code commit, offering speedy feedback to your development team and preventing visual problems from reaching production.
By following these essential steps, you can efficiently set up, execute, and maintain automated visual tests with Selenium, helping to certify your web applications’ visual consistency and quality.
- Analyze Test Outcomes
Scrutinizing test results is a productive step in the automated visual testing process. Visual testing libraries give detailed reports underlining visual discrepancies. Here’s how you can efficiently analyze and act on the results:
- Access Test Reports: Depending on the visual test library you are using, you will have access to reports produced after every test run. Such information often includes screenshots underlining differences between the captured and baseline images.
- Prioritize Issues: Examine the test reports to recognize visual discrepancies. Prioritize issues based on their severity and impact. Some differences might be cosmetic and minor, whereas others might be critical to the user experience.
- Collaborate with the Team: Share the test findings and results with your design and development teams. Collaboration is critical to understanding the reasons and root causes of visual problems and planning essential fixes.
- Debugging: Investigate the visual discrepancies grounds. This may include scrutinizing changes in the CSS, app code, or external factors affecting visual presence.
- Update Baselines: If the variances are due to expected changes in the User Interface, update the baseline screenshots to match the new projected appearance. Make certain to follow your version control process to maintain baseline changes.
- Regression Testing: For any critical visual problems fixed, add regression testing to your suite to prevent them from reoccurring in the future.
- Automation Enhancements: Constantly progress your automated visual testing process. This might include expanding test coverage, refining test scripts, or optimizing the CI/CD pipeline.
- Reporting and Feedback: Provide opinions to the development team regarding the visual problems. Visual testing reports can serve as evidence of problems that require attention.
By following these important steps, you can intelligently run visual tests automatically as part of your CI/CD pipeline and proficiently analyze test results to maintain the visual consistency and quality of your web apps.
Advantages of Automated Visual Testing with Selenium
Automated visual tests with Selenium provide various noteworthy advantages for web development and QA processes. Here are some of the key benefits:
- Cross-Browser and Cross-Device Compatibility
- Early Detection of Visual Defects
- Regression Testing
- Consistent Test Execution
- Increased Testing Efficiency
- Increased Test Coverage
- Enhanced User Experience
- Improved Collaboration
- Scalability
- Continuous Integration and Continuous Delivery (CI/CD) Integration
- Data-Driven Testing
- Cost Savings
In short, automated visual testing with Selenium delivers a suite of advantages that contribute to faster development cycles, enhanced software quality, and a better user experience. It is a valuable addition to your test strategy, mainly in modern web development environments where visual consistency is crucial.Perform automated visual testing using the LambdaTest platform
Running automated visual testing using the LambdaTest platform can be beneficial. LambdaTest is an AI-powered test orchestration and execution platform that lets you run manual and automated tests at scale with over 3000+ real devices, browsers, and OS combinations. Using this platform you can automate the procedure of capturing screenshots and relating them with baseline images across distinct devices and browsers. Here is a step-by-step guide to conducting automated visual tests with LambdaTest:
Prerequisites:
You must have an active account in LambdaTest. You can also sign up for free on the LambdaTest website.
Step 1: Sign In to LambdaTest
Browse the LambdaTest site and log in to your account.
Step 2: Generate a Visual Testing Project
In the LambdaTest dashboard, generate a new project or choose an existing one to organize your visual tests.
Step 3: Set Up Automated Visual Testing
Within your project, you can set up automated visual tests by using popular test automation frameworks such as Selenium, WebDriverIO, or other frameworks that the platform accepts and supports. Here’s an instance using Selenium WebDriver (Python):
Replace YOUR_USERNAME and YOUR_ACCESS_KEY with your LambdaTest credentials. Customize the competencies according to your testing requirements.
Step 4: Execute Actions and Capture Screenshots
In your test script, execute actions such as navigating to web pages, interacting with components, and capturing screenshots using Selenium WebDriver commands. Such activities will be recorded and compared during the test process.
Step 5: Run Automated Visual Tests
Execute your automated visual tests by implementing your test script. LambdaTest will automatically capture screenshots at every step defined in your test script.
Step 6: Review Visual Test Results
LambdaTest will compare the baseline images with captured screenshots and produce a visual test report. You can access the information via the LambdaTest dashboard.
Step 7: Analyze and Debug
Review the test report to detect any visual issues or discrepancies. LambdaTest will provide facts and details about the variances, including screenshots highlighting the variations.
Step 8: Collaborate & Fix Issues
Team up with your software development and design teams to scrutinize the causes of visual discrepancies. Make required fixes in your app’s code or update baseline images if the alterations are expected.
Step 9: Re-Test & Automate Regression
After addressing the problems, re-run your automated visual tests to confirm that the discrepancies have been resolved. Make certain that your visual tests are incorporated into your CI/CD pipeline to catch regressions with individual code changes automatically.
Step 10: Create and Share Reports
Produce and export detailed visual test reports from LambdaTest to share with your QA team and for documentation purposes.
By following these steps, you can effectively run automated visual testing using the LambdaTest platform, certifying the visual consistency of your web apps across diverse devices and browsers.
Conclusion
In a world where web apps must meet higher visual quality standards and constancy across diverse environments, automated visual testing with Selenium is a precious addition to the software testing toolbox. By incorporating Selenium with visual testing libraries, you can streamline the complete test process, catch visual bugs/ intricacies early, and ensure a flawless user experience across devices and browsers. Embrace automated visual tests to accelerate your development cycle and deliver superior-quality web apps to your users.
In fact, by leveraging this approach with a robust platform like LambdaTest, development teams can deliver web apps that function properly and look polished and professional, ultimately leading to business success.